Scabies, a highly contagious skin condition caused by the Sarcoptes scabies mite, can cause intense itching and discomfort. Prompt diagnosis is crucial for effective treatment and preventing the spread of the disease. One diagnostic method gaining recognition is the adhesive tape test.
In this article, we will explore the adhesive tape test in detail, including its purpose, execution, interpretation of results, and its importance in diagnosing scabies accurately.
Overview of the Adhesive Tape Test
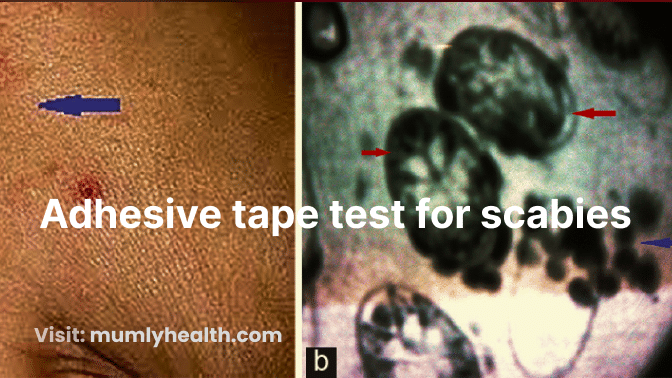
The adhesive tape test is a diagnostic procedure used to detect the presence of scabies mites, eggs, or fecal matter on the surface of the skin. It is a non-invasive and relatively simple method that can provide valuable information for diagnosing scabies.
The purpose of the adhesive tape test is to collect specimens from the affected areas of the skin and examine them under a microscope.
By adhering transparent adhesive tape to the skin and then removing it, the test collects any potential mites, eggs, or faecal matter that may be present on the skin surface.
The test is typically performed on areas of the body where scabies infestation is common, such as between the fingers, wrists, elbows, armpits, genitals, and buttocks. These areas often exhibit the characteristic signs of scabies, including rashes, itching, and red bumps.
To conduct the adhesive tape test, a strip of adhesive tape is cut to an appropriate length and pressed firmly onto the affected area of the skin. The tape is then gently rubbed to ensure contact with any mites or eggs. Afterwards, the tape is carefully peeled off, and the collected specimens adhere to its sticky surface.
Preparing for the Adhesive Tape Test
Preparing for the adhesive tape test is crucial to ensure accurate results and minimize any potential sources of error. By following the proper preparation steps, you can enhance the effectiveness of the test. Here’s a detailed guide on how to prepare for the adhesive tape test:
- Clean the affected areas: Start by gently cleaning the areas of the skin where scabies symptoms are present. Use a mild cleanser and warm water to wash the skin thoroughly. Pat the skin dry with a clean towel to remove any excess moisture. This step helps remove debris, oils, and surface contaminants that could interfere with the tape’s adhesion.
- Choose the right adhesive tape: Select a transparent adhesive tape that is suitable for the adhesive tape test. Look for medical-grade or hypoallergenic tapes to minimize the risk of skin irritation or allergic reactions. Ensure that the tape is clean, free from any dirt or debris, and properly stored to maintain its adhesive properties.
- Clean your hands: Before performing the adhesive tape test, it’s important to clean your hands thoroughly. Wash your hands with soap and warm water to remove any dirt, oils, or potential contaminants. Dry your hands properly with a clean towel or use a hand sanitiser to ensure they are free from any substances that could affect the test results.
- Maintain overall hygiene: It’s essential to maintain good overall hygiene during the adhesive tape test process. This includes ensuring that your clothing, bedding, and any other materials that come into contact with the affected areas are clean. Regularly washing and changing these items can help prevent cross-contamination and reduce the risk of spreading scabies.
- Avoid applying creams or lotions: Before conducting the adhesive tape test, refrain from applying any creams, lotions, or ointments to the affected areas. These substances can interfere with the tape’s adhesion and potentially contaminate the collected specimens, leading to inaccurate results. If you have already applied any topical medications, wait for a sufficient period as advised by your healthcare professional before performing the test.
Performing the Adhesive Tape Test
Performing the adhesive tape test for scabies requires careful execution to collect accurate specimens. By following these step-by-step instructions, you can conduct the test effectively:
Gather the necessary materials:
- Transparent adhesive tape (medical-grade or hypoallergenic)
- Scissors (if needed)
- Glass slide or a clean surface for attaching the tape
- Marker or pen for labelling
Identify the affected areas
Determine the areas of the skin where scabies symptoms are present. Common sites include the fingers, wrists, elbows, armpits, genitals, and buttocks. Ensure that the skin is clean and dry before proceeding.
Cut an appropriate length of adhesive tape
Using the scissors (if needed), cut a strip of adhesive tape long enough to cover the affected area. The tape should be wide enough to ensure adequate contact with the skin for optimal specimen collection.
Apply the adhesive tape to the skin:
- Take the cut strip of adhesive tape and carefully position it over the affected area.
- Press the tape firmly onto the skin, ensuring good adhesion. Gently rub the tape for a few seconds to enhance contact with the skin surface and encourage the collection of specimens.
- Pay attention to the edges of the tape to ensure proper adhesion and avoid lifting.
Remove the adhesive tape:
- Slowly peel off the adhesive tape from the skin after it has been firmly applied. Try to maintain a steady and even motion to prevent specimens from detaching.
- Make sure to remove the tape without folding or crumpling it, as this can lead to loss or contamination of the collected specimens.
Attach the tape to a glass slide or clean surface:
- Place the adhesive side of the tape onto a glass slide or a clean surface designated for the test.
- Smooth out the tape to ensure it lays flat on the slide or surface without any folds or wrinkles.
- Use a marker or pen to label the slide or surface with relevant information, such as the patient’s details and the location of the test site.
Read Also: "Can Dettol Kill Scabies?"
Allow the tape to air-dry:
- Leave the tape undisturbed in a clean and dry area, allowing it to air-dry for a few minutes. This step ensures that the collected specimens remain intact and adhere to the tape’s surface.
Once the tape has dried, it can be examined under a microscope to observe any scabies mites, eggs, or fecal matter present. If necessary, multiple adhesive tape tests can be performed on different affected areas to increase the likelihood of detecting scabies specimens.
performing the Adhesive Tape Test
Performing the adhesive tape test correctly is crucial for reliable results. Here’s how it is done:
- Cut a strip of adhesive tape, long enough to cover the affected area.
- Firmly press the tape onto the skin and gently rub it for a few seconds.
- Carefully peel off the tape, ensuring the collected specimens adhere to it.
- Attach the tape to a glass slide or a clean surface, sticky side up.
- Label the slide with the patient’s information and the location of the test site.
- Repeat the process for multiple affected areas if necessary.
- Allow the tape to air-dry for a few minutes.
Prevention and Treatment of Scabies
To prevent the spread of scabies, follow these preventive measures:
- Practice good personal hygiene, including regular handwashing.
- Avoid close contact with individuals who have scabies until they have completed treatment.
- Wash clothes, bedding, and towels in hot water to kill any potential mites.
Treatment for scabies typically involves topical creams or lotions that kill the mites and alleviate symptoms. Oral medications may be prescribed in severe cases.
Conclusion
The adhesive tape test serves as a valuable diagnostic tool in the identification of scabies. While it has its limitations, it can provide valuable information to aid in the diagnosis process.
However, it is essential to seek medical advice for an accurate diagnosis and appropriate treatment. By understanding the adhesive tape test and its role in scabies diagnosis, we can take proactive measures to combat this bothersome skin condition effectively.